

Why Do Essential Oil Diffusers Leak? Causes and Fixes
Table of Contents
- Common Reasons Why Essential Oil Diffusers Leak
- How Much Water to Put in Diffuser (And Why It Matters)
- Troubleshooting Ultrasonic Diffuser Problems: Leaks, Spitting, and Clogs
- How to Clean Essential Oil Diffuser to Prevent Leaks
- Material Compatibility: How Essential Oils Degrade Plastic and Seals
- Environmental Factors: Humidity, Temperature, and Airflow
- Repair vs. Replace: A Decision Matrix for Leaking Diffusers
- Frequently Asked Questions
Last Updated: September 11, 2026
Common Reasons Why Essential Oil Diffusers Leak
Most diffusers leak for three reasons: overfilling, a misaligned lid, or an uneven surface. Fix those and you eliminate most puddles before they start.
This guide from Castellanos Housing explains why essential oil diffusers leak, how to diagnose the cause fast, and when a leak means repair versus replacement.

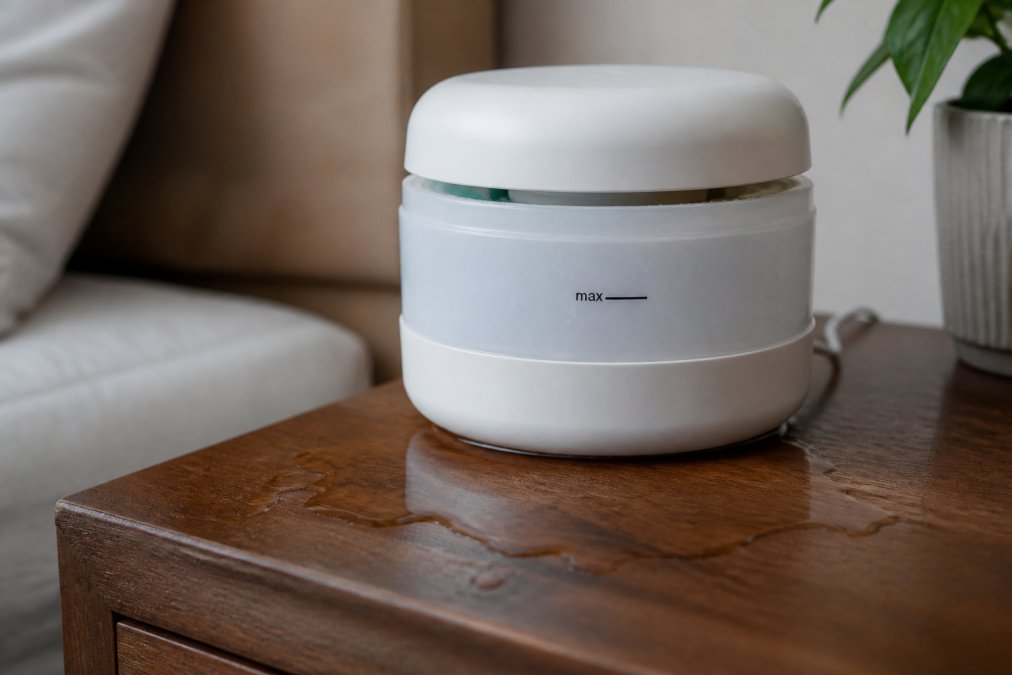
Overfilling Past the Max Fill Line
The max fill line exists because ultrasonic diffusers need headroom. Fill past it and water has nowhere to go but out.
With too little air space, the vibrating plate pushes water through the lid seam instead of the mist outlet, a slow leak that looks like a defect but is user error. Stop pouring at the line, every time.
Improper Lid or Cover Alignment
A crooked lid breaks the seal; even a few millimeters of misalignment lets mist condense on the rim and drip down the side.
Check three things: the lid sits flush with no gap, the gasket is seated in its groove, and the mist outlet points up. If the cover rocks when you press a corner, reseat it.
Uneven or Tilted Surfaces
Diffusers are gravity-fed. On a tilted surface, water pools against one side of the reservoir and finds the lowest seam.
A surface that looks level can still slope enough to cause this. Test with a bubble level or known-flat counter; a silicone mat with a slight lip also catches minor drips.
How Much Water to Put in Diffuser (And Why It Matters)
Fill to the max fill line, never above it, and never below the minimum mark. Most small diffusers hold between 100 and 300 milliliters.
Below the minimum, the ultrasonic plate runs dry and overheats. Above the maximum, water escapes through the lid instead of turning into mist. For a shorter session, use less water rather than a timer alone.
| Container Size | Water to Add | Typical Runtime |
|---|---|---|
| 100 ml | 80 ml | 2-3 hours |
| 200 ml | 160 ml | 4-5 hours |
| 300 ml | 240 ml | 6-8 hours |
If your diffuser has continuous and intermittent modes, expect the intermittent setting to roughly double runtime on the same amount of water.
Troubleshooting Ultrasonic Diffuser Problems: Leaks, Spitting, and Clogs
Troubleshooting ultrasonic diffuser problems starts with separating a leak from a spit. A leak drips from the base or seam. Spitting throws droplets from the mist outlet. They have different causes.
Work through this sequence:
- Empty the reservoir and dry it completely.
- Inspect the lid gasket for cracks, stiffness, or debris.
- Check the ultrasonic plate for mineral film or oil residue.
- Refill to the line on a level surface.
- Run for ten minutes and watch where moisture appears.
Where the water shows up tells you what to fix next.
Clogged Ultrasonic Plate or Mist Outlet
A clogged plate does not just reduce mist output, it changes the vibration pattern and can push water up through the lid. Hard water leaves calcium and magnesium deposits; essential oils leave a sticky film. Clean the plate with a cotton swab dipped in white vinegar, then rinse, and never scrape it.
Condensation Buildup Inside the Unit
Condensation is normal; condensation that runs back into the base is not. High output, cool room air, and a narrow mist outlet all increase it. When droplets form faster than they evaporate, they run down the inside of the cover and out the seam. Lower the output, raise the room temperature slightly, and add ventilation.
How to Clean Essential Oil Diffuser to Prevent Leaks
Learning how to clean essential oil diffuser components properly is the most effective leak prevention step. Most leaks trace back to a dirty plate or an oil-coated gasket.
Follow this routine weekly:
- Unplug the unit and empty any remaining water.
- Mix one part white vinegar with three parts water.
- Fill the reservoir halfway and run for 5 minutes.
- Empty, then wipe the ultrasonic plate with a cotton swab.
- Rinse the reservoir and lid with clean water.
- Dry every part completely before reassembly.
For daily use, empty and dry the reservoir each morning. Oils left sitting oxidize into a film that hardens into a seal-breaking crust.
Material Compatibility: How Essential Oils Degrade Plastic and Seals
Most guides stop at "citrus oils are hard on plastic." The real question is which polymers survive which oil compounds, and why the same diffuser can run two years with lavender but fail in three months with lemon.
The Chemistry Behind the Damage
Essential oils are blends of terpenes, terpenoids, aldehydes, ketones, phenols, and esters. The aggressive ones act as solvents against the polymers that hold your diffuser together.
- Limonene and other monoterpenes (heavy in citrus: orange, lemon, grapefruit, bergamot) soften and swell many commodity plastics.
- Aldehydes (cinnamon bark, cassia) react with some resins and can cloud clear components.
- Phenols (clove, oregano, thyme) are the harshest class and attack rubber and some silicone formulations.
- Ketones (peppermint, rosemary) are milder but still contribute to long-term seal fatigue.
A diffuser that leaks after months of daily citrus use is usually not defective. It is chemically degraded.
Which Plastics Actually Hold Up
Not all "plastic" is the same. Here is how common reservoir and housing materials compare against aggressive oils:
| Material | Common Use in Diffusers | Resistance to Terpenes/Phenols | Notes |
|---|---|---|---|
| Polypropylene (PP, recycling code 5) | Reservoir walls, inner tanks | Good | The default choice for oil-safe reservoirs |
| High-density polyethylene (HDPE, code 2) | Some tanks, caps | Good | Slightly more permeable to aroma over time |
| Polycarbonate (PC, code 7) | Clear covers, windows | Poor | Can craze, cloud, and crack with limonene exposure |
| Acrylic (PMMA) | Decorative covers | Poor | Etches and stress-cracks |
| Polystyrene (PS, code 6) | Cheap housings | Very poor | Softens quickly with citrus |
| BPA-free copolyester (e.g., Tritan) | Premium clear parts | Good | Better clarity retention than PC |
| Glass or ceramic | Reservoir | Excellent | Inert to all common oils |
| Silicone (platinum-cure) | Gaskets, seals | Good | Resists swelling better than peroxide-cure silicone |
| Natural rubber / EPDM | Older gaskets | Poor | Swells and loses seal |
"BPA-free" tells you nothing about oil resistance. BPA is a monomer used in polycarbonate; a BPA-free copolyester can still be a poor match for clove oil. Look for the recycling code, not the marketing claim.
Gaskets Are Usually the First Failure Point
Even when the reservoir is PP or glass, the gasket between lid and tank is often the weak link. Silicone gaskets come in two cure types:
- Platinum-cure silicone resists swelling and stays dimensionally stable with most oils.
- Peroxide-cure silicone is cheaper and can absorb terpenes, swell, and lose its seal within months of heavy citrus use.
If your gasket feels gummy, stretched, or leaves residue on your fingers, it has absorbed oil. Replace it before it fails completely.
Practical Rules for Aggressive Oils
- Dilute strong oils more heavily. A 2-3% dilution is plenty for aroma; neat oil accelerates degradation (naha.org).
- Rotate your oils. Do not run citrus or clove daily in the same unit. Alternate with lavender or cedarwood.
- Rinse after every session. Terpenes left on plastic diffuse into the polymer. A 30-second rinse resets the clock.
- Prefer glass or ceramic reservoirs for citrus, clove, oregano, or cinnamon.
- Check the manufacturer's material list. "Essential oil diffuser" on the box does not guarantee the plastics are rated for terpene exposure.
Signs the Polymer Has Already Failed
- The gasket feels sticky, stretched, or gummy
- Plastic near the reservoir looks cloudy, etched, or crazed with fine cracks
- The lid no longer snaps into place firmly
- A faint chemical smell mixes with the oil scent
- The reservoir wall feels softer or tackier than when new
Once the polymer degrades, no cleaning routine reverses it. Replace the gasket if that is the only failed part, or the unit if the reservoir or housing has lost structural integrity.
U.S. EPA guidance on indoor air quality and volatile organic compounds
Environmental Factors: Humidity, Temperature, and Airflow
Ambient humidity and room temperature change how much a diffuser condenses and where moisture ends up. In a humid room, the air cannot absorb more vapor, so mist condenses on the lid, runs down the sides, and pools at the base; cold rooms and poor airflow make it worse.
Practical adjustments:
- Keep the room below roughly 60% relative humidity where possible
- Avoid running the diffuser next to a window or air conditioning vent
- Give the unit at least 15 centimeters of clearance on all sides
- Move it away from walls where mist can collect and drip
Repair vs. Replace: A Decision Matrix for Leaking Diffusers
Most leaking diffusers are fixable. The hard part is knowing which leak is a five-minute reseat and which means the unit is done. Use this sequence before buying a repair kit or a new diffuser.
Step 1: Rule Out User Error First
Before assuming hardware failure, run this 10-minute test:
- Empty and dry the reservoir with a lint-free cloth.
- Inspect the lid gasket for cracks, stiffness, debris, or oil residue.
- Wipe the ultrasonic plate with a cotton swab dipped in white vinegar.
- Refill to the max fill line, not above, not below.
- Set the unit on a known-flat surface, away from vents and windows.
- Run it for 10 minutes and watch where moisture appears.
If the leak stops, the cause was user error or a dirty seal. If it continues, move to Step 2.
Step 2: Locate the Leak
Where the water exits tells you what failed:
- Lid seam drip, gasket or lid alignment issue. Usually repairable.
- Base puddle, overfill, tilt, or a cracked reservoir. Repairable if the crack is not in the tank.
- Mist outlet spitting, clogged plate or overfilled reservoir. Repairable with cleaning.
- Water inside the housing, internal seal failure or corrosion. Usually not repairable.
- Leak only after months of use with citrus or clove, polymer degradation. Gasket replacement may help; reservoir replacement usually does not.
Step 3: Apply the Decision Matrix
| Symptom | Likely Cause | Repair Cost | Replace? |
|---|---|---|---|
| Drips from lid seam | Misaligned lid | $0 | No, reseat |
| Drips from lid seam after reseating | Worn gasket | Low (gasket kit) | No, replace gasket |
| Puddle under base, unit level | Overfilling | $0 | No, refill to line |
| Puddle under base, unit tilted | Uneven surface | $0 | No, level the unit |
| Spitting from outlet | Clogged plate | $0 | No, clean with vinegar |
| Leak after months of daily citrus use | Gasket degradation | Low (gasket kit) | No, replace gasket |
| Leak after months, gasket looks fine | Reservoir or housing degradation | N/A | Yes, replace unit |
| Cracked reservoir | Physical damage | N/A | Yes, replace unit |
| Water inside base housing | Internal seal or corrosion | N/A | Yes, replace unit |
| Chemical smell with leak | Corrosion or plastic breakdown | N/A | Yes, replace unit |
Step 4: The Cost Math
A replacement gasket kit costs a fraction of a new diffuser and solves the most common recurring leak, the lid seam drip that returns every few weeks. If the gasket is the only failed part, replacing it is almost always right.
Replacement becomes the better choice when:
- The reservoir or housing is cracked, crazed, or visibly degraded
- The base shows corrosion, discoloration, or water intrusion
- The unit is more than two to three years old and has run daily
- A replacement gasket does not stop the leak
- You smell a chemical or burning odor during operation
Step 5: When to Stop Repairing
If you replace the gasket and the leak returns within weeks, the problem is upstream, usually the reservoir or housing. Replacing gaskets on a degraded unit throws money at a symptom. Replacement is then the safer, cheaper path.
A unit with automatic shutoff also reduces the consequences of a slow leak: it stops drawing power and pushing water once the reservoir empties, so a small drip does not become an overnight puddle.
For a compact option that fits small spaces, the New USB Portable Mini Air Humidifier 200 ML Ultrasonic Essential Oil Diffuser runs on continuous or intermittent modes with automatic shutoff after 4 to 9 hours. The auto shutoff matters here: a unit that stops itself when the water runs out does not sit with a full reservoir slowly seeping onto your furniture.
U.S. Consumer Product Safety Commission guidance on small appliance safety
Frequently Asked Questions
Why does my oil diffuser keep leaking?
Your diffuser likely leaks because of overfilling past the max fill line, a misaligned lid or gasket, or a clogged ultrasonic plate. Water can also condense and drip if the unit sits on an uneven surface. Check the fill level, reseat the cover, and clean the plate with a vinegar solution to stop most leaks.
Can overfilling an essential oil diffuser cause leaks?
Yes. When you fill past the max fill line, water enters the air channel and overflows through the seams. Always leave a small gap below the line. Overfilling also forces the ultrasonic plate to work harder, which can shorten its life.
How do I clean my diffuser to prevent clogging and leaking?
Unplug the unit and empty the water reservoir. Mix one part white vinegar with three parts water, pour it in, and run the diffuser for 5 minutes. Drain and wipe the ultrasonic plate with a cotton swab. Rinse thoroughly and dry before refilling. Clean every 3 to 5 days if you use essential oils daily.
My diffuser is spitting out water. What should I do?
Spitting usually means the water level is too high or the ultrasonic plate is dirty. Empty the reservoir to just below the max fill line and clean the plate with a vinegar-soaked cotton swab. Also check that the mist outlet isn't blocked. If spitting continues, reduce the essential oil concentration to 3-5 drops per 100 ML.